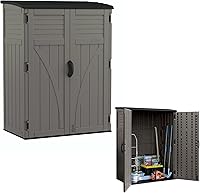
How to Reinforce a Plastic Shed
To reinforce a plastic shed, fix the base first, then brace the walls and anchor the frame. A level, solid foundation and corner bracing stop the flexing and lifting that damage resin panels.
On this page (7 sections)
- Why does a plastic shed need reinforcing?
- How do you start by checking the base?
- What kind of base stops a plastic shed from moving?
- How do you brace the walls of a plastic shed?
- How do you stiffen and anchor a plastic shed roof?
- Which parts do you check first after a storm?
- When is reinforcing a plastic shed worth the effort?
To reinforce a plastic shed, fix the base first, then brace the walls and anchor the frame. A level, solid foundation and corner bracing stop the flexing and lifting that damage resin panels.
Most failures start at the floor, not the walls.
If you are still choosing a shed, our roundup of the best plastic storage sheds covers the models with the strongest frames. This guide covers the steps to firm up a shed you already own.
Why does a plastic shed need reinforcing?
A resin shed is light, so wind and an uneven floor move it more than a wooden one. The panels flex, screws work loose, and doors stop lining up.
Plastic sheds win on upkeep and price. Our comparison of plastic sheds vs wooden sheds shows where each type holds up, and movement at the base is the weak spot for resin.
A shed on soft ground slowly settles, so one corner drops and the frame twists. Wind grabs the roof edge and lifts panels that aren't tied down.
Bracing and a proper base fix both problems.
The frame is usually the part that gives. Resin panels are stiff in the middle but flexible at the seams, and the seams are where screws back out first.
Once one corner moves, the rest of the shed follows, so a small wobble you ignore in autumn becomes a door that won't close by spring. Water makes it worse.
Ground that holds water softens under the floor, and a soft floor lets the walls lean.
How do you start by checking the base?
Stand inside the shed and look for gaps under the floor and along the wall seams. A shed that rocks when you press a corner has a base problem.
Check the ground around the shed for pooling water and soft patches. Look at the door: if it drags or won't latch, the frame has already moved.
Tighten any loose panel screws you find, then note where the floor meets the walls. Small gaps there point to settling.
Fix the base before adding bracing, because braces on a twisted frame hold the twist in place. A spirit level across the floor and along two walls tells you how far out of level it is.
Write the readings down so you can tell after the repair whether the frame has settled further.
What kind of base stops a plastic shed from moving?
A plastic shed needs a flat, drained base that spreads its weight. A concrete pad, paving slabs or a gravel-filled grid all work, and each suits a different budget and yard.
Concrete is the most stable and the most permanent. Paving slabs are easier to lay and can be lifted later.
A gravel and grid base drains well and costs less than concrete. Whatever you choose, the surface must be level and compacted before the shed goes on.
For a closer look at base layers and drainage, see what to put under a resin shed.
A base does two jobs at once. It spreads the shed's weight over a wide area so the floor doesn't sink in one spot, and it moves rainwater away from the floor so the panels don't sit in wet ground.
A base that does only one of those jobs still leaves the shed at risk. A flat pad that traps water softens over time, and a drained base that isn't level lets the frame twist.
Which ground grid works for a plastic shed base?
A permeable grid filled with gravel is the base most people build themselves. These three grids differ in depth, load rating and coverage, so match one to your shed's size and weight.
The TRUEGRID PRO LITE covers 72 square feet with 18 panels at 24 x 24 x 1 inches, and it carries a 120,000 lb load class. TRUEGRID makes it in the USA from recycled HDPE, and it drains instantly so water never sits under the floor.
That combination suits a shed base on soil that stays damp. The panels lock with 3-point locking tabs and x-anchors, which keep the grid from spreading when gravel is compacted into it.
It can also be saw cut to fit an odd footprint. The maker rates it as residential grade and backs it with a 5 year warranty against manufacturer defects.
The Vodaland HexPave covers 65 square feet with 22 units at about 1 inch deep. It handles up to 27,000 lb depending on the base and fill, and Vodaland says it works as a shed base filled with sand or gravel.
The panels cut easily with a hand saw, which helps on an odd-shaped footprint. It's a lighter-duty choice than the TRUEGRID for a large, heavy shed.
Vodaland recommends filling the cells with gravel of 1/2 inch or smaller for a complete fill, and it treats the HexPave as a walking path and patio grid rather than a heavy-duty driveway grid. That makes it a good fit for a small garden shed on a patio or path edge.
The VEVOR Ground Grid is the deepest of the three at 2 inches. One roll covers about 106 square feet at 27 ft x 4 ft, and VEVOR rates it to 1,885 lbs per square foot when filled.
The extra depth holds more gravel, which helps on soft or sloped ground where you need more support. It's also the most budget-friendly way to cover a large area.
VEVOR describes the honeycomb cell structure as spreading load across the base, which is what keeps a soft foundation from sinking under a heavy load. The roll folds for transport and storage, so it's easy to carry to the back of a garden.
Whichever grid you pick, dig out the area, lay a weed membrane, set the grid, and fill the cells with compacted gravel. Then check the surface with a level before the shed goes down.
If the site slopes, VEVOR notes that its grid suits slopes and flat areas and helps hold the terrain in place, but you still need to cut and step the ground so the shed sits flat. A grid filled on a slope won't level the shed for you.
How do you brace the walls of a plastic shed?
Add diagonal braces across the corners and along long walls. Braces stop the panels from racking, which is the side-to-side sway that loosens fixings.
Measure the corner first. A brace cut to fit snugly between the floor frame and the top of the wall does the most good.
Fix it to the frame ribs with screws the maker allows, and seal each hole with plastic-safe sealant. Long walls flex in the middle, so a vertical brace at the midpoint helps there.
Keep braces inside the shed so they don't spoil the look, and leave space around the door so it still opens fully. Don't over-tighten screws into thin panels, because they crack.
Diagonal bracing works best in pairs. A brace across one corner resists sway in one direction only, so fit braces on opposite corners and the frame resists movement both ways.
On a long shed, one brace per end wall and one vertical brace at the midpoint of each side wall is a sensible pattern. Use a straight timber batten or a metal strap, whichever you can fix cleanly to the ribs.
Cut the brace slightly long and tap it into place so it presses against the frame, then fix it.
How do you stiffen and anchor a plastic shed roof?
Tie the roof edge down and add a brace across the rafters. Wind lifts a roof when the edge moves, so the fixings along the eaves matter most.
Check that every roof panel screw is tight and seated. Add a brace across the rafters if your area gets heavy snow, but stay within the maker's stated snow load.
If the shed maker sells a roof support kit, use it. Then anchor the whole structure to the base with ground anchors at each corner.
Screw-in anchors suit soil and paving, while bolt-down anchors suit concrete. Anchoring at the base is what keeps the shed from lifting in a storm.
Anchors work by tying the shed down at the point where the wind force is lowest, so the roof edge can't peel back. Fit one at every corner and, on a long shed, one at the midpoint of each side.
Follow the maker's fixing points rather than drilling new holes through a panel. If the shed has no fixing points, drill into the frame ribs and seal each hole after the anchor goes in.
Check the anchors after the first storm and tighten them again.
Which parts do you check first after a storm?
Check the base, the corner braces and the roof edge in that order. These three points show damage before the rest of the shed does.
Look for new gaps under the floor and any corner that has dropped. Push each corner brace to feel for a loose screw.
Run a hand along the roof edge for lifted panels. A door that suddenly sticks is a sign the frame has shifted.
Re-tighten what's loose and replace any cracked panels. Fix small problems before winter, when snow load adds to the strain.
Keep a note of the date you last checked, so you know when the twice-yearly inspection is due.
When is reinforcing a plastic shed worth the effort?
Reinforce when the base is soft, the frame moves or storms are common in your area. A solid base and corner braces cost little and add years to a resin shed's life.
Skip the work only if the shed sits on a level concrete pad and stays rigid when you press its corners. For most owners on soil or gravel, the base upgrade comes first.
Compare storage sheds for the money if you're weighing a new buy against reinforcing what you have. Doing how to reinforce a plastic shed in the right order, base then braces then anchors, is the difference between a shed that lasts and one that warps in the first windy season.
Frequently asked questions
Can you strengthen a plastic shed against wind?
Anchor the frame to the base with the manufacturer's anchors and brace the corners. Wind lifts panels when the roof edge and walls move, so tying the structure down at the base and stiffening the corners does most of the work.
Does a plastic shed need roof support for snow?
Many resin sheds carry a snow load rating, and some makers sell roof support kits. Adding a brace across the rafters helps when local snowfall is heavy, but stay within the maker's stated load.
What can I put under a plastic shed to stop it sinking?
Use a gravel and grid base, a concrete pad or paving slabs. A permeable grid filled with gravel spreads the shed's weight and drains water away so the floor stays level.
Can I screw into a plastic shed to add bracing?
Yes, but only into the frame or ribs and only with fasteners the maker allows. Sealing each hole with a plastic-safe sealant keeps water out of the wall.
How often should I check a plastic shed for movement?
Check the base and fixings twice a year and after any storm. Look for gaps at the floor, loose screws, a sticking door or a roof edge that has lifted.