How to Level Ground for a Shed, Step by Step
To level ground for a shed, mark a site, remove high spots, fill low areas, and compact the soil in layers. Check the surface with a long straightedge and level, then build a base that suits your shed and local conditions.
On this page (10 sections)
- How do you level ground for a shed step by step?
- Where should you put a shed?
- What tools help you check the ground?
- How do you handle high and low spots?
- What base should go on the leveled ground?
- How can you tell if the shed site is level?
- What mistakes can make a shed base settle?
- How should you choose the lowest-cost approach?
- What should you do before assembling the shed?
- Related guides
To level ground for a shed, mark the footprint, remove high spots, fill low areas, and compact the surface in layers. Check it with a long straightedge and level, then prepare a firm base that suits the shed and the site.
A level base helps the shed frame sit square and reduces the chance that doors or panels bind during assembly. The cheapest way to level ground for a shed is often to choose a naturally flat, well-drained spot and move soil from small high areas into nearby low ones.
How do you level ground for a shed step by step?
Set the footprint, clear the site, cut high spots, fill low spots, compact, and check the surface. Work in small stages so you can spot uneven areas before they are hidden under the base.
- Check the shed instructions for the base size and any site requirements.
- Mark the shed footprint and the space needed to work around it.
- Remove grass, roots, rocks, and loose topsoil.
- Cut down high areas and use suitable soil to fill shallow low spots.
- Compact the ground in thin layers, then check it with a level and straightedge.
- Add the chosen shed base and check its level again before assembly.
Don't rush the checks at the end. A surface that looks flat from a distance can still have dips that leave parts of the shed floor unsupported.
Where should you put a shed?
Choose a firm, well-drained spot with enough room for the shed and its doors. Avoid low places where rainwater collects, soft ground that shifts underfoot, and areas where tree roots may interfere with the base.
Check for buried utilities before digging, and review local rules if the shed is close to a property line or easement. Leave access for assembly and future maintenance, including space to open doors fully.
The area around the shed can slope gently away to help surface water drain, while the shed base itself stays level. For more site and upkeep guidance, see our shed preparation and care guide.
What tools help you check the ground?
Use stakes, string, a tape measure, a shovel, a rake, a tamper, and a long straightedge with a level. A string line gives you a fixed reference across the footprint, while the straightedge helps reveal dips between checks.
Mark the shed corners with stakes and run string between them. Check the lines from several sides, then use the straightedge and level across the site in more than one direction.
A hand tamper can compact a small area, but larger or deeper work may call for rented equipment or professional grading. Don't compact wet, sticky soil; wait until it is workable, since the surface can become uneven again as it dries.
How do you handle high and low spots?
Cut down high spots and fill shallow low spots with suitable material in compacted layers. Avoid leaving loose soil beneath the base, since it can settle after the shed is assembled.
Remove vegetation and organic topsoil first. Roots, grass, and buried debris can decay or shift, leaving voids under the shed.
For deeper low spots, use a suitable fill material and compact it a little at a time. If the site needs a retaining wall, substantial excavation, or a large amount of fill, get advice from a qualified local contractor.
Can you use a ground grid on uneven ground?
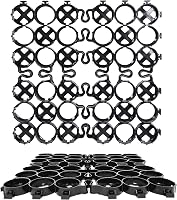
A ground grid can help contain fill across a site, but it doesn't remove the need to prepare a stable, level base. Correct the underlying slope and soft spots first, then use a grid only if it suits the shed instructions and site conditions.
The VEVOR Ground Grid, 27 x 4 ft is a cuttable HDPE grid with 2 in deep cells. Its maker describes it for use with gravel, soil, sand, or grass, including shed bases and slopes.
Plan how the grid will be secured and filled before spreading it out. Check the shed maker's base requirements, especially if the shed floor needs continuous support.
What base should go on the leveled ground?
Choose a base that matches the shed instructions, ground conditions, and drainage needs. A leveled soil area is only part of the job; the finished base must also provide the support the shed calls for.
Some sites use gravel, pavers, a frame, or a concrete pad. Compare the options in our guide to what to put under a resin shed, and see how to build a gravel shed base if gravel is a fit.
When does a permeable paver base make sense?
A permeable grid may suit a shed site where you want water to pass through the surface into an aggregate base. The ground still needs suitable preparation and drainage, and the base must meet the shed maker's requirements.
The PRO LITE Permeable Paver Base is a plastic grid made from post-consumer recycled HDPE. TRUEGRID describes it as permeable and lists shed bases among its intended uses.
Plan the aggregate layer and finished height before setting the grid. Keep the shed footprint square and level, and make sure the finished surface won't direct water toward the shed.
When is a shed floor base kit useful?
A shed floor base kit can help keep a compatible shed square and raise stored items off the ground, but it isn't a complete floor by itself. Confirm the shed model and decide how you'll finish the floor before buying a kit.
The Arrow FDN109 Shed Floor Base Kit fits specified 8 x 8 ft, 10 x 8 ft, and 10 x 9 ft Arrow sheds, except Arrow Elite and Ezee sheds. It is a steel frame; plywood and other floor finishing materials aren't included.
Use exterior-grade plywood if finishing it with wood, as Arrow specifies. The kit may also serve as a form for concrete, so plan the finished base before assembling the shed.
How can you tell if the shed site is level?
Check the footprint in several directions with a straightedge and level, then confirm the corners are at matching heights. Repeat the check after compacting and again after placing the finished base.
Rest the straightedge across the center and edges, not just along the perimeter. If the level shows a slope or you see a gap beneath the straightedge, adjust the surface and check again.
Before shed assembly, confirm that the base is firm, square, and free of loose debris. If the shed instructions give a specific tolerance or base dimension, use those instructions as your final guide.
What mistakes can make a shed base settle?
Leaving topsoil, roots, loose fill, or poor drainage beneath the base can lead to movement. Avoid building on soft ground or hiding dips with a thin layer of loose material.
Don't assume a grid or frame will correct an unstable site. Prepare the ground beneath it, compact fill in layers, and make sure rainwater has a path away from the shed.
If the ground shifts after heavy rain or stays saturated, pause and fix the drainage problem before assembly. A stable site makes the base easier to maintain and the shed easier to keep square.
How should you choose the lowest-cost approach?
For a small shed on nearly flat ground, start by choosing a naturally level site and reusing excavated soil for shallow low spots. This can limit extra materials, but it still takes careful compaction and checking.
Choose a grid or paver system when its drainage and support features fit your site and shed instructions. Choose a compatible frame kit when it matches your shed model and you have a plan for the floor material.
If the footprint needs deep cuts, substantial fill, or retaining work, compare the total work and materials before starting. Once the ground is ready, follow our gravel shed base steps if that is the base you chose.
What should you do before assembling the shed?
Confirm the base is level, firm, square, and sized for the shed. Remove loose debris, check the corners and center again, and gather the floor or finishing materials required by your base design.
Follow the shed instructions during assembly, and check the frame as you build. If the frame begins to twist or a door opening looks out of square, stop and recheck the base before continuing.
Choose a naturally level site and careful soil work for a small, shallow correction. Use a suitable base system when its requirements match the shed, and get local help when the ground needs major grading.
Related guides
- How to build a gravel shed base that stays flat
- What to put under a resin shed
- Shed preparation and care
Frequently asked questions
What is the cheapest way to level ground for a shed?
For a small, shallow uneven area, careful digging and reuse of soil from high spots may be the lowest-cost approach. You still need a firm, well-drained base that matches the shed instructions.
If you need imported fill, retaining work, or major grading, compare the full cost before choosing a site.
How flat does the ground need to be for a shed?
The base should be level and firm enough for the shed to sit square, with no soft spots or loose fill that can settle. Follow the shed maker's instructions for allowable slope and base dimensions, then check the finished area with a straightedge and level before assembly.
Can I level ground for a shed without digging?
You may be able to raise a low area with suitable compacted fill, but simply placing a base over uneven ground can leave the shed unsupported or out of square. Remove vegetation and loose topsoil first, and check local drainage and the shed instructions before choosing a no-dig approach.
Should a shed base be perfectly level?
A shed base should be level enough for the floor and frame to sit square, as required by the shed maker. The surrounding yard can slope away to help move water, but don't tilt the base unless the instructions allow it.
Check the level in several directions before building.